


Rubber molding begins with material selection to meet application demands. Natural rubber or various synthetic rubber types cover needs ranging from oil resistance to flame retardancy. Compounding experts determine optimal starting formulas by incorporating custom plasticizers, fillers, or other additives to achieve ideal characteristics. The raw materials dictate properties after parts take shape inside steel molds. Here are a few of the steps in the molding process:
Contents
1. Pre-mold Processing
Raw rubber undergoes processing first through batching, mixing, and milling. Batching uses precision scales to weigh the proportions of rubber, curatives, catalysts, and chemicals required in each custom compound. Powerful mixers then homogenize ingredients to facilitate even dispersion. This mixing step activates crosslinking reactions that later give finished rubber parts their elasticity and durability. Uniformly blended materials get shaped into workable sheets or strips via milling. Extruders create continuous lengths of material.
2. Heating
Equipment heats the pre-processed rubber compound until it is pliable for shaping. Rubbers become moldable at certain controlled temperatures. Heating methods adapt depending on whether you are oven-curing strips or using integrated components to manipulate stock temperatures during injection molding. Setting accurate process temperatures enables material flow and formation inside the awaiting mold cavities. This prevents over-curing too early before the molding process finalizes.
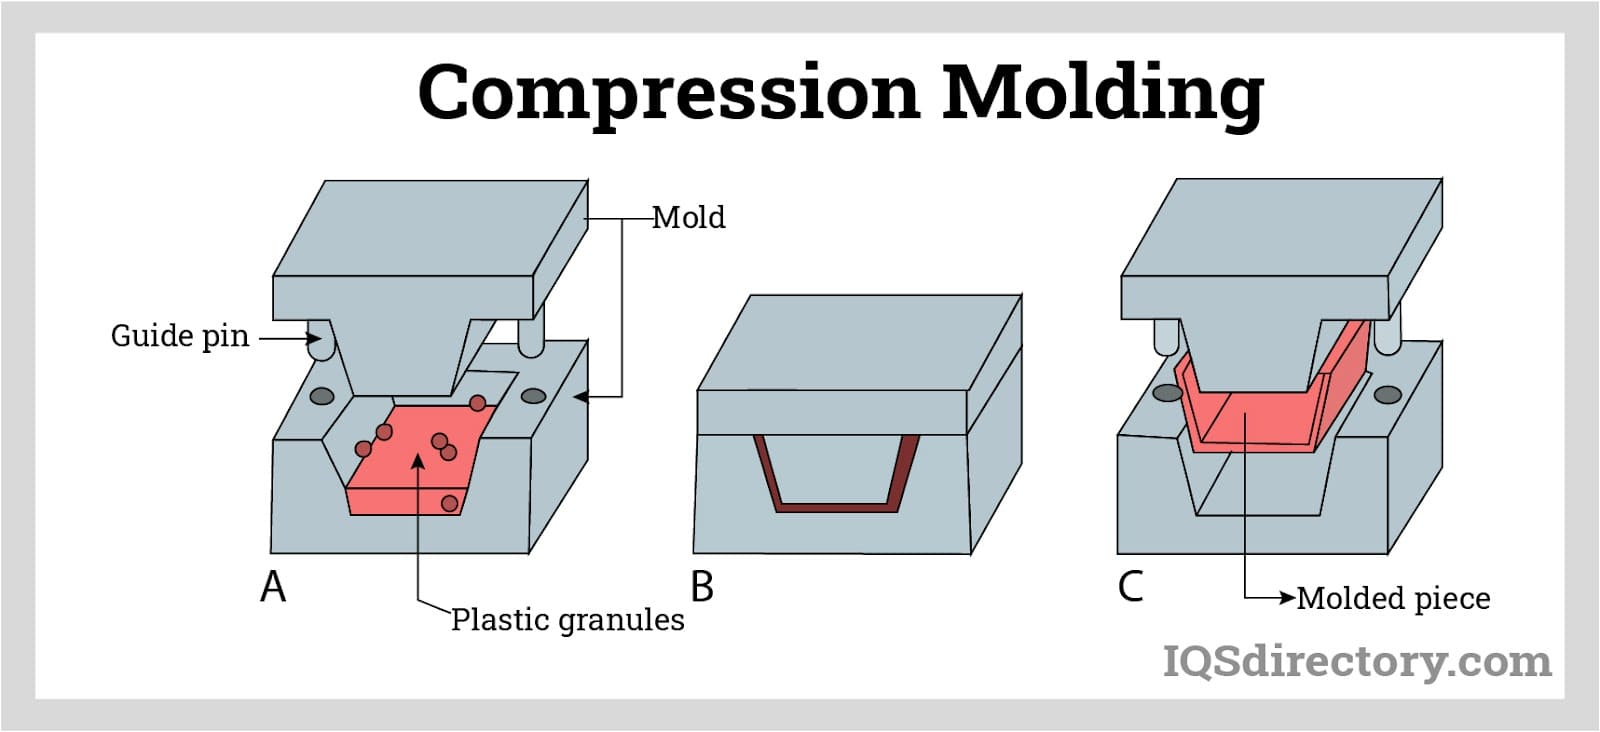
3. Mold Cavities
Heated rubber flows into multi-part steel mold cavities through ramming, pumping, or inserting preforms. Intricate molds define the part’s final dimensional specifications via integrated core components, machined cavities, and moving lifters. Tightly closing molds contain the rubber, while applied pressure fills every void. Gates, runners, and cooling channels fine-tune material flow rates and temperatures to prevent premature curing before parts acquire their intended shape. More complex parts will demand complex molding, while simple parts use basic molding.
4. Cooling
After curing inside closed molds, cooling the pieces back to room temperature helps before opening molds for removal. Water or air cooling channels surrounding cores and cavities assist with cooling. Inadequate cooling causes instability issues later when relaxing parts try to shrink back down. Cured rubber needs more time than traditional plastics due to higher residual heat levels after rubber molding. Striking the right cooling duration balance impacts cycle efficiency.
5. Finishing Touches
Demolded parts undergo extra finishing steps to boost aesthetics or functionality. Trimming removes excess rubber that is left around the edges. De-flashing also eliminates mold parting lines on surfaces. Media blasting toughens certain areas against heavy use, like frequent squeezing or pulling. Holes get drilled before quality technicians perform final inspections and attach hardware before shipment.
Engage a Reliable Rubber Molding Company Today
All finished rubber molding components undergo rigorous quality assurance checks before customer approvals. Dimensional gauging tools confirm parts meet precise engineering specifications dictated by each application. Physical property verifications are also common. Durometer gauges validate hardness levels match the intended material grade selections. Only products passing every checkpoint are packaged and shipped out to become integrated components in finished goods across various industries. Find a reputable rubber molding manufacturer for your various rubber products today.


+ There are no comments
Add yours